



Outlook PST files collect in places nobody planned for: an old file server, the laptop of someone who left two years ago, a shared folder simply called “Archive.” When an organization decides to bring that history into Exchange Online, the question changes from “how do I open a PST?” to “how do I move hundreds of them, into the right mailboxes, without losing track of any?”
Microsoft’s answer is the PST Import service in the Microsoft Purview portal. With the network upload method, you upload the files to a temporary Azure Storage location using AzCopy, tell the service which file belongs to which mailbox in a CSV file, and then let it import the data, filtered if you choose. It is free and it works, but a few details catch administrators out: file-name case, a 30-day clean-up window on the uploaded files, and a retention hold that is switched on after the import.
This guide follows the process in order, points out those details where they matter, and explains when a different approach may suit you better, for example when you would rather import PST to Office 365 straight from the machines where the files already sit. Portal labels change from time to time, so treat Microsoft’s own page as the final reference.
At a Glance
| Quick summary. Network upload is an administrator task. You upload PST files with AzCopy, map them to mailboxes with a CSV file, then run and monitor the import in Microsoft Purview. |
- Who can do it: an administrator with the Mailbox Import Export role (see Step 1).
- Size and naming: Microsoft says each PST should be no larger than 20 GB, and each file name must be unique.
- Mapping file: one row per PST, with a maximum of 500 rows per CSV file.
- Upload tool: AzCopy only, and only the version offered in the Purview portal. Azure Storage Explorer cannot be used to upload.
- Speed: upload time depends on your bandwidth. Microsoft’s planning guidance puts the import rate at about 24 GB per day per mailbox, with different mailbox and PST pairs importing in parallel.
- Two clocks to watch: uploaded files are deleted from Azure 30 days after the most recent import job was created (if no job is in progress), and the import turns on retention hold for each target mailbox.
What Should You Know Before Importing PST Files?
First decide whether you are importing one PST into your own Outlook profile or migrating organizational PST files into Microsoft 365 mailboxes. These are different processes, and this guide covers only the second.
| Method | Best for | Things to know |
|---|---|---|
| Outlook Import/Export wizard | One user adding a PST to their own Outlook profile | Done in desktop Outlook by the user. Not designed for bulk, admin-led migration. |
| Network upload (this guide) | Many PST files going to many Exchange Online mailboxes | Free. Uses AzCopy, a CSV mapping file and the Purview Import service. |
| Drive shipping | Very large data volumes | Costs apply. Microsoft’s overview lists up to 10 TB per drive and 10 drives per import job. |
| Third-party migration software | PST files scattered across devices, or needs beyond Microsoft’s workflow | Test with sample data first. See the comparison later in this guide. |
Prerequisites for PST Import
Have the following ready before you create an import job:
- A Microsoft 365 organization, with Exchange Online mailboxes to receive the data. If you plan to import into archive mailboxes, those archives must already be enabled.
- An administrator account with the required permissions (Step 1).
- The PST files on a file share or file server in your organization, or in an Azure Storage location you manage. AzCopy uploads a whole directory; it cannot upload a single named file.
- The AzCopy executable downloaded from the Import page in Purview. It is a single file, so there is nothing to install.
- A CSV mapping file that lists each PST and its destination mailbox.
- Enough network capacity and time to upload and then import the data.
- A plan for checking the imported data afterwards.
Microsoft supports PST files created by Outlook 2007 and later. Both Unicode and ANSI PST formats can be imported; Microsoft recommends Unicode, and ANSI is mainly relevant for languages that use a double-byte character set. Review Microsoft’s requirements and limits before you plan a large project.
Step 1: Assign the Required Permissions
The account that creates and runs the import job needs specific permissions. Without them, the Import page may not appear in Purview, or you may be unable to create a job.
Microsoft’s PST import documentation lists two Exchange Online roles for organizational imports:
- Mailbox Import Export: required to import PST data.
- Mail Recipients: required to create import jobs in the Microsoft Purview portal.
Microsoft recommends using roles with the fewest permissions needed and keeping the number of Global Administrators low, so avoid granting broad admin rights just to get past a missing permission. A dedicated role group for PST import also makes it easier to see later who could run imports.
To configure access:
- Sign in to the Exchange admin center with an account that can manage role groups.
- Go to Roles > Admin roles.
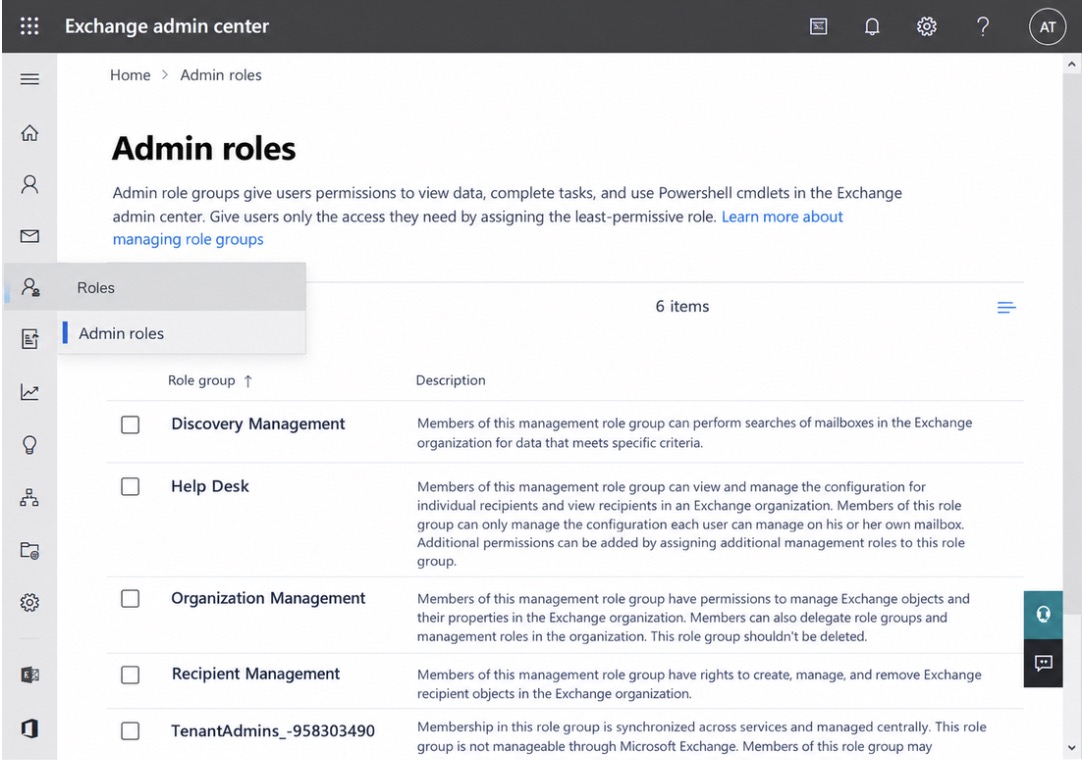
Admin Roles
- Open an existing role group (the screenshot below uses Organization Management) or create a dedicated group for PST import.
- On the Permissions tab, add the Mailbox Import Export role, and add Mail Recipients if the group does not already include it. Select Save.
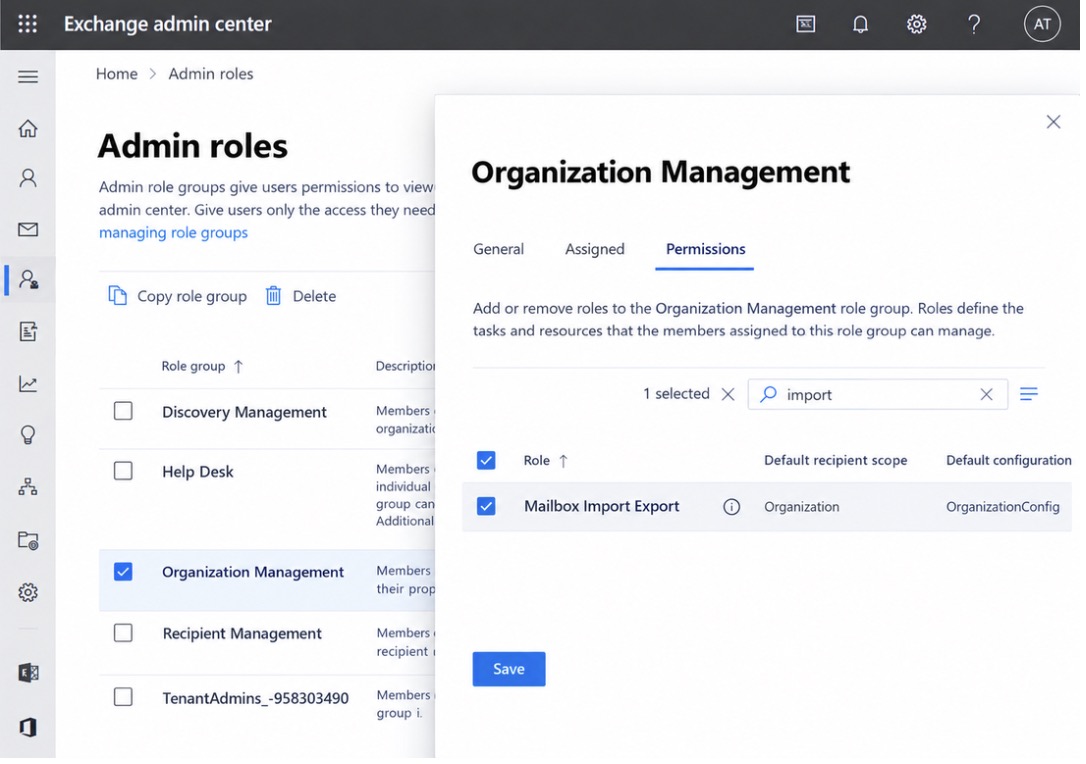
Organisation management
- Add the administrator who will run the import to that role group.
- Allow time for the change to take effect, then sign out, sign back in, and confirm that the Import page is available in Purview.
If the Import page is still missing, review the assigned roles and Microsoft’s current Purview access requirements before changing anything else.
Step 2: Copy the SAS URL and Download AzCopy
This step gives you the two things the upload needs: your organization’s upload address (a SAS URL) and the AzCopy tool. Microsoft notes that you only need to do this step once; for later batches you start from Step 3.
- Open Microsoft Purview and sign in with the authorized account.
- Go to Data lifecycle management > Microsoft 365 > Import. If the navigation looks different, follow Microsoft’s current instructions.
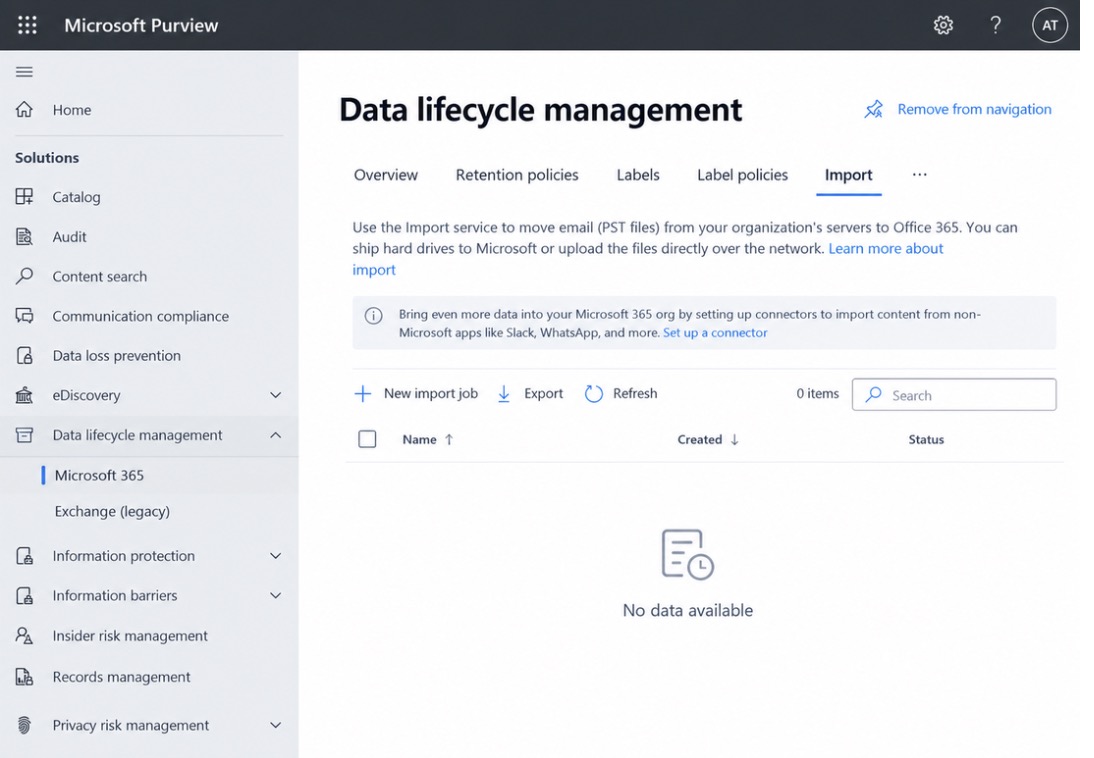
Data Life Cycle Management
- Select New import job.
- Enter a job name. Microsoft allows lowercase letters, numbers, hyphens and underscores only; uppercase letters and spaces are not accepted.
- On the Do you want to upload or ship data? page, select Upload your data, then Next.
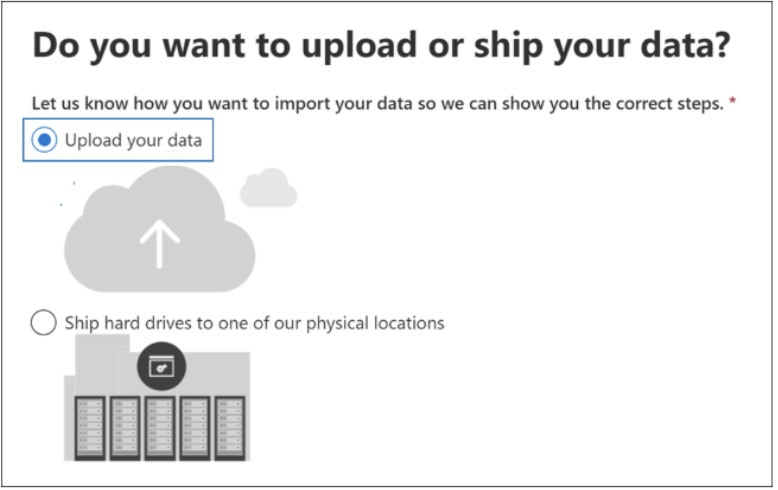
Screenshot
- On the Import data page, select Show network upload SAS URL, copy it, and save it somewhere secure.
- Select Download Azure AzCopy and save the file to the computer you will upload from.
You can then close the wizard. The import job itself is created later, in Step 5, once the files are uploaded and the mapping file is ready. Treat the SAS URL like a password: it grants upload access for your organization, so never post it in tickets, chats or public documents.
| Use the portal’s AzCopy only. Microsoft states that a different AzCopy version is not supported for this workflow, and that Azure Storage Explorer cannot be used to upload PST files. |
Step 3: Upload PST Files Using AzCopy
AzCopy copies the PST files from your source location to the Azure Storage area that Microsoft provides for your organization. Start by gathering the files into one clearly named folder, and make sure the account running AzCopy can read them.
Open Command Prompt in the folder that contains azcopy.exe and run the command below, replacing the path and the placeholder:
azcopy.exe copy “C:\PSTFiles” “<YOUR_ORGANIZATION_SAS_URL>”
For a network share, the source looks like this:
azcopy.exe copy “\\FILESERVER01\PSTFiles” “<YOUR_ORGANIZATION_SAS_URL>”
Keep the double quotation marks around both values. These are templates: use the exact SAS URL from your own Purview page, and follow Microsoft’s current syntax.
Details that save you a re-upload
- The source must be a directory. Every PST file in it is uploaded, so keep unrelated files out of the folder.
- Subfolders change the file path. The –recursive option (on by default) includes PST files in subfolders, and they are stored under a different path. You must enter that exact path in the CSV file in Step 4.
- You can upload to a subfolder. Adding a subfolder name after ingestiondata in the SAS URL places the files there instead of at the root. Remember the exact spelling and case.
- Scripts need escaping. If you put the SAS URL in a batch file, change % to %% and & to ^&.
- Copying from an Azure Storage account? For a general-purpose v2 account you can add –s2s-preserve-access-tier=false; access tiers do not need to be preserved for this scenario.
Check the result
- Read the AzCopy output for failures. The final message shows how many files uploaded successfully.
- Compare that count and the file names with your source inventory.
- Investigate any failed transfer before you build the mapping file.
Once the command works, save it in the same secure place as the SAS URL. For the next batch, usually only the source path changes.
Optional: confirm what was uploaded
Microsoft Azure Storage Explorer can connect to the upload area with your SAS URL and show the files that arrived, including their exact names and folder paths. That is useful when you write the CSV file, because names are case-sensitive. It is view-only for this purpose: you cannot upload to or delete from the area with it, and Microsoft advises detaching the container when you finish, otherwise you may get an error the next time you attach.
| Mind the 30-day clock. Uploaded files are deleted automatically. If no import job is in progress, everything in the upload area is removed 30 days after the most recent import job was created. Plan to create your job within 30 days of uploading. |
Step 4: Prepare the PST Import CSV Mapping File
The mapping file tells Microsoft 365 which mailbox receives each PST file and where the data goes inside that mailbox. Download Microsoft’s official template from the network upload page and do not rename or remove any header columns, including the SharePoint ones, which the PST import ignores. Replace all placeholder rows with your own data.
A completed file with fictional names looks like this:
Workload,FilePath,Name,Mailbox,IsArchive,TargetRootFolder,ContentCodePage,SPFileContainer,SPManifestContainer,SPSiteUrl
Exchange,,finance-user.pst,finance.user@contoso.com,FALSE,/ImportedPST,,,,
Exchange,,finance-user-archive.pst,finance.user@contoso.com,TRUE,,,,,
Exchange,PSTFiles,hr-user.pst,hr.user@contoso.com,FALSE,,,,,
Each row represents one PST file going to one mailbox. In the example, the second row sends an archive PST to the same user’s archive mailbox, and the third row refers to a file that was uploaded into a subfolder named PSTFiles.
Important CSV fields
| Field | What to enter | Watch for |
|---|---|---|
| Workload | Exchange for importing to Exchange Online mailboxes. | Leave as Exchange for PST import. |
| FilePath | Blank if the files are at the root of the upload area. Otherwise the subfolder name, without ingestiondata. | Case-sensitive, and must match the case used in the SAS URL subfolder. |
| Name | The exact name of the uploaded PST file. | Case-sensitive. AnnB.pst and annb.pst do not match. Must be unique within the job. |
| Mailbox | The destination mailbox email address. | Public folders and Microsoft 365 groups are not supported. For an inactive mailbox, or when two mailboxes share an address, use the mailbox GUID. |
| IsArchive | FALSE or blank for the primary mailbox; TRUE for the archive mailbox. | If the archive is not enabled, that row fails, though other users in the job are not affected. A 100 GB per-import limit applies to archive imports. |
| TargetRootFolder | Where in the mailbox the data lands. | See the next section. |
| ContentCodePage | Optional. A code page number for ANSI PST files. | Mainly for Chinese, Japanese and Korean content, where folder names can otherwise be garbled. |
How TargetRootFolder behaves
- Left blank: the PST is imported into a new folder named Imported at the root of the mailbox, level with the Inbox.
- A named folder such as /ImportedPST: the data goes into a folder with that name, also level with the Inbox. This keeps imported mail separate and is the safest choice for a first run.
- A single slash (/): the PST folder structure is imported at the top of the mailbox, and folders that already exist are merged. A PST Inbox merges into the existing Inbox. Choose this only when merging is what you want.
Microsoft suggests running a few test batches to decide which setting suits your project.
Validate the mapping before you submit it
- Every PST in the CSV exists in the upload area.
- File names and folder paths match the uploaded values exactly, including case.
- Each destination mailbox address (or GUID) is correct.
- The archive setting matches the intended destination, and archives are enabled.
- The header row is unchanged.
- The file has no more than 500 data rows. Validation fails above that, so split larger projects into several mapping files and several import jobs.
Step 5: Create and Validate the PST Import Job
Now return to Purview and create the real import job, using the mapping file you just prepared.
- Go to Data lifecycle management > Microsoft 365 > Import and select New import job.
- Enter a job name (lowercase letters, numbers, hyphens and underscores) and select Upload your data.
- On the Import data page, select I’m done uploading my files and I have access to the mapping file, then Next.
- Select Select mapping file and choose your CSV.
- Select Validate. The file name turns green when validation succeeds. If it fails, open View log to see the error for each failing row, correct the CSV, and validate again.
- Read and accept the terms and conditions, then select Save to submit the job.
After the job is submitted, its status shows Analysis in progress, and then Analysis completed once Microsoft 365 has examined the PST data and is ready for you to import. Selecting the job opens a flyout with the status of each PST file in the mapping file. Do not move on while validation errors are unresolved. Common causes are wrong file names or case, invalid mailbox addresses, mismatched folder paths and a CSV that does not follow the template.
Step 6: Filter the Data and Start the Import
During analysis, Microsoft 365 identifies the age of the items and the types of messages in your PST files. When analysis completes, you can import everything or trim the data first.
- On the Import tab, select the analyzed job and choose Import to Microsoft 365.
- On the Filter your data page, review the data insights, including information about the age of the data.
- Choose Yes, I want to filter it before importing to set filters, or No, I want to import everything. Microsoft’s separate guide on filtering data when importing PST files covers the filter options.
- If you import everything, select Next and then Import data to start the job.
Filter only when it matches the project. A full historical archive usually needs every item, while a targeted migration may have a documented date range or content scope. Write down the filters you applied and why, so you can explain later why some items are not in the destination mailbox.
Step 7: Monitor the Import and Verify the Mailbox Data
A finished upload does not mean the data is in Exchange Online. Uploading and importing are separate stages, and you should watch both.
- Refresh the job status in Purview and open the job to see the status of each PST file.
- Investigate any file or item reported as failed, and record warnings and what you did about them.
- Wait for the job to reach Complete.
Time depends on data volume, upload speed and service processing. Microsoft’s planning guidance gives about 24 GB per day for a single mailbox, so a large PST going to one mailbox takes time even after the upload finishes. Different mailbox and PST pairs import in parallel, which helps when you are spreading data across many users.
Then check the destination mailboxes. Look at representative emails, attachments, dates and folder placement, and compare against your source inventory. Do not treat one item count as proof of success, because filters and item handling can explain differences. For business-critical moves, ask mailbox owners or testers to confirm that the history they expect is there before you close the project.
After the import: retention hold
Microsoft’s documentation explains that the Import service turns on retention hold for the target mailbox for an indefinite period after a PST is imported. This sets the RetentionHoldEnabled property to True, so the retention policy assigned to that mailbox is not processed. The intent is to give the owner time to manage the newly imported messages before an archive or deletion policy acts on older items. You do need to decide when to end it, or those mailboxes will quietly stop applying their retention policies. In Exchange Online PowerShell you can either switch it off or set an end date:
Set-Mailbox -Identity user@contoso.com -RetentionHoldEnabled $false
Set-Mailbox -Identity user@contoso.com -EndDateForRetentionHold 12/31/2026
If you use an end date, leave RetentionHoldEnabled set to True. Alternatively, adjust the retention policy first (for example, lengthen its age limits) so imported older items are not deleted or moved straight away, and then turn the hold off. Date formats follow your regional settings.
Common PST Import Problems and How to Resolve Them
The Import Option Is Missing
The account may lack the required roles, or the permission change may not have taken effect yet.
- Confirm that Mailbox Import Export and Mail Recipients are assigned through a role group.
- Verify that the account is a member of that role group, then sign out and in again.
- Review Microsoft’s current Purview access requirements.
A PST File Fails to Import
The usual causes are a mapping entry that does not match the upload, a missing upload, or a problem with the destination.
- Compare the CSV row with the file as it appears in the upload area, including the exact case of the name and any subfolder path.
- If the row targets an archive, confirm the user’s archive mailbox is enabled. An archive failure for one user does not stop other users in the job.
- Confirm the target mailbox exists and is eligible.
- Open the job’s per-file status for details.
The CSV File Fails Validation
- Keep the original header row, unchanged.
- Check every file name, mailbox address and path, and that no name is repeated.
- Make sure the file has 500 data rows or fewer.
- Open View log in the validation step to see the error for each failing row.
Purview Does Not See Your Files, or the Job Cannot Find Them
If a lot of time passed between upload and job creation, the files may already have been removed. Uploaded files are deleted 30 days after the most recent import job was created when no job is in progress, and older jobs may then show an empty file list. Upload again and create the job promptly.
Data Appears in an Unexpected Folder
TargetRootFolder controls placement, and blank, / and a named folder behave differently (see Step 4). Check the value for each row and inspect the destination folders before you rerun anything.
Duplicate Items Appear After a Re-Import
Microsoft’s FAQ explains that duplicate detection uses a SourceEntryId stamped on each imported item. It does not compare subject, date, body or size, and the behavior cannot be configured. In practice:
- Re-importing the same PST into the same target folder skips items that were already imported.
- Re-importing it into a different target folder imports everything again.
- A different PST with overlapping content is treated as new, because its identifiers differ.
- On a first import, items that already exist natively in the mailbox have no identifier to match, so copies can appear.
Before repeating an import, check which folder the previous job used. For more detail, see Microsoft’s PST import FAQ.
When Should You Consider a Dedicated PST Migration Tool?
Microsoft’s native workflow suits many organizations, particularly when PST files already sit on a file server, and an administrator is comfortable with the command line and CSV files. It starts to feel heavy when PST files are spread across user devices, when you want folder-level control or detailed progress reports, or when you cannot assign the Mailbox Import Export role.
One option to evaluate is Stellar Stellar Migrator for Outlook, The comparison below uses Microsoft’s documentation for the native method and Stellar’s product page for the software, so confirm the current edition, limits and supported configurations on that page before deciding.
| Microsoft network upload | Stellar Migrator for Outlook (per Stellar’s product page) | |
|---|---|---|
| Source files | On a file share, file server or Azure Storage you manage; uploaded with AzCopy | Selected directly from any system or network location, with no need to collect them in one place first |
| Mapping | CSV file you prepare, one row per PST | Automatic mailbox mapping, which you can edit, or a CSV of pre-mapped mailboxes |
| Filtering | Filters based on the analysis insights, such as item age | Date filter and folder-type filters, and an option to import into a specific folder |
| Re-runs | Duplicates depend on SourceEntryId and the target folder | Incremental (delta) migration for re-runs |
| Reporting | Job and per-file status in Purview | Job Progress and Mailbox Progress reports that can be exported |
| Formats and targets | PST files to Exchange Online mailboxes | PST and OST files to Microsoft 365 or Exchange Server |
| Permissions | Mailbox Import Export role (and Mail Recipients) | Admin credentials with Application Impersonation rights on the destination, |
| Cost | Free for network upload | Pay-per-use licensing |
Best Practices for Importing PST Files to Microsoft 365
- Inventory your PST files first, with owners and sizes, so you can reconcile at the end.
- Back up the source files and limit access to them, since they contain sensitive mailbox data.
- Use the least-privileged permissions that let the import run.
- Keep the SAS URL out of shared documents and chat.
- Use only the AzCopy version from the Purview portal.
- Keep PST files at or below 20 GB and give each a unique name.
- Save the working AzCopy command and the final CSV with the project record.
- Test a small batch before the full import, including your chosen TargetRootFolder.
- Create the import job within 30 days of uploading.
- Record the filters you applied, and the date you ended each mailbox’s retention hold.
- Verify the destination mailboxes before closing the project.
Frequently Asked Questions
Can I import PST files into Microsoft 365 without Outlook?
Yes. Administrators can use the PST Import service in Microsoft Purview, which does not require the Outlook desktop import wizard. This guide covers the network upload method.
Can I import multiple PST files into Microsoft 365 at once?
Yes. The service supports bulk import. You upload the files, prepare a mapping file with up to 500 rows, and create a job. For more than 500 PST files, create several mapping files and several jobs.
How long does a PST import take?
It depends on data volume, your upload speed and service processing. Upload and import are separate stages, so plan for both. Microsoft’s planning figure is about 24 GB per day for one mailbox, and different mailbox and PST pairs run in parallel.
Is there a size limit for each PST file?
Microsoft says each PST should be no larger than 20 GB, and that larger files might affect import performance. Archive-mailbox imports also have a 100 GB per-import limit.
Can I import a PST file directly into an archive mailbox?
Yes, if the user’s archive mailbox is enabled. Set IsArchive to TRUE in the mapping file. If the archive is not enabled, the row for that user fails.
How long are my PST files kept in Azure after upload?
Not indefinitely. If no import job is in progress, all files in the upload area are deleted 30 days after the most recent import job was created. You also cannot delete uploaded files yourself.
Does importing a PST file automatically remove duplicates?
Not in the way many people expect. Microsoft’s matching uses SourceEntryId and the target folder, not message content. Re-importing the same PST into the same folder skips items already imported, but a different folder, or a different PST with overlapping mail, can create duplicates.
Can I import PST files into a shared mailbox?
The mapping file takes the email address of the destination mailbox, and Microsoft states that public folders and Microsoft 365 groups are not supported targets. The pages we reviewed do not spell out shared mailboxes, so test with a single PST and confirm the result in the job status before planning a bulk import.
Conclusion
Importing PST files into Microsoft 365 comes down to preparation and checking: the right permissions, exact file names, a clean mapping file, a sensible target folder, and a deliberate decision about retention hold when the import is done. Microsoft’s network upload method gives you a structured, free way to move organizational PST data, as long as you keep an eye on the limits and the 30-day window.
Run a small batch first, write down what you learn, and only then scale up. For the latest prerequisites, always check Microsoft’s guide: Use network upload to import PST files to Microsoft 365.